Then and Now

I was swinging by some old posts and I caught this one, where I detailed out how we rearranged the furniture in our living space. And I saw the pic I took of our living room and giggled. Here is the pic:

THEN

THEN

And here is what that space looks like now.

NOW

NOW

Yes, that’s a baby in the middle of all the hubbub. And that is Max creeping up on the lower right hand corner. We’ve overtaken his previous blankie spot. Now he slumps against the door to snooze. He doesn’t understand why SHE has so many blankies all over the house and he’s just got the one upstairs now.

Too much stuff. And it keeps growing every day. Yikes.

Nesting Part 2

Continuing from the previous post … the other change we made at my insistence was to rearrange the living room furniture. I have about a zillion pictures I’ve taken of food, but no “before” pics of our living area. If I find one I’ll update this post. But, basically our couch was sorta in the middle of our living space and it caused the living area, which includes our dining room table, to look cramped. So I basically pushed it so it was against the wall with a window. Moved the bench that was against the wall/window to the wall that is adjacent to our front door. Moved the credenza that was sitting where our bench now sits to an empty wall that is closer to the kitchen. And suddently things opened up.

Couch against the wall (was in front of the fireplace, basically)

Couch against the wall (was in front of the fireplace, basically)

Bench that was beneath window now against wall adjacent to door.

Bench that was beneath window now against wall adjacent to door.

Credenza moved to wall closer to kitchen

Credenza moved to wall closer to kitchen

Max never cared much before, but now enjoys the new living space from the couch.

Max never cared much before, but now enjoys the new living space from the couch.

The one thing we’ll have to figure out … the credenza now sits where we usually put our Christmas tree. The husband insists that the tree will now have to sit in the center of the living area (where the couch used to sit … notice the circle of life going on here). We’ll see, husband, we’ll see.

Nesting

More about this pregnancy stuff. What they say, about nesting … I guess it’s true. Since June we’ve been overhauling the house we’ve lived in the past four years. You already saw the deck that we built (finally!). The past four years I’ve wanted to create a guest room from a spare room in the basement that has done nothing but house a lot of junk. Boxes that we’ve not unpacked since we moved in four years ago. Here’s a hint … if you haven’t had the need for something in an unpacked box for four years, you are probably okay with getting rid of it.

So, in late June we held our first garage sale. We also sold a lot of stuff on Craigslist. We cleaned out that room, and I have just one box left that I need to go through. We went to IKEA a few weeks ago to buy some closet parts. Nearly straight out of the catalog, although our room dimensions didn’t fit the way the catalog had it. My current closet is in the room that will soon become a nursery. So, I needed a new spot for my stuff. That spot is the future (now present) guest room.

We purchased a futon frame from Craigslist (incidently from a guy who lived in the exact apartment friends of ours lived in 10 years ago. What are the odds?). We bought a new futon mattress from Overstock.com (Hint: $2.95 shipping! Even on a full-size futon). That arrived earlier in the week. Voila. A guest room! Just in time for an upcoming visit from M&D.

What do you think of the artwork?

What do you think of the artwork?

PAX closet from IKEA

PAX closet from IKEA

Damp-rid in the corner

Damp-rid in the corner

Note the “Damp-Rid” on the bedside table.  I’m trying to do what I can to get rid of the “basement dampness” of this room. If you have any suggestions, please send them on!

What I Did On My Summer Vacation

I have not been posting for a bit. It’s summertime, and the room in our house with the computer in it gets real hot by the evening, so, no offense, but the last thing I want to do is sit in front of the computer. Besides, it’s summer. Aren’t I supposed to be playing outside and stuff?

Anyway, earlier in July I took off a few days (see previous posts about the sis’ visit to Seattle), so the husband and I could build a new deck. At last I can show you the final product. Not final-final product. We have to add a cap railing, and we want to do some other cool things, like add solar lights and stuff. Oh yeah. We also need furniture, too.

But, without further ado I present to you the before and after pics. If you want, you can also view the entire deck-building process via a fine Flickr slide show.
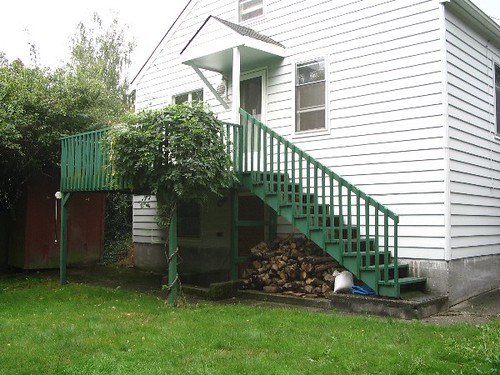
deck via chattycha on flickr

Before: Note the crazy wisteria vine/weed growing up one of the posts. We later learned that the beam was cut and half and held together by some screws and such. Shims were in place in the posts to level the thing, which the husband knocked down with a couple of whacks with a hammer. And the cement posts were all a sham. The posts sat on TOP of the cement, and wasn’t stabilized by it all.
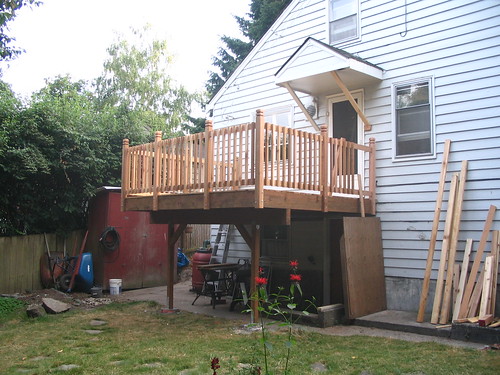
deck via chattycha on flickr

After: Treated lumber as the base (posts, beams, joists, etc). Cedar decking on top. We did away with the stairs and added more square footage compared to the old cruddy deck. Still on the to-do list: Add cap railings, staining, throw in some solar lights and furniture and voila.

Many thanks to Joanne and Pete, for their assistance, advice and company in helping to put the beam up. And to all the wonderful people at Dunn Lumber, Olson Lumber, Home Depot and City People’s Mercantile for happily accepting a lot of money for stuff.